This article covers what happens once the goods turn up: where the receiving screen lives, how to book in a part delivery, the four outcomes that decide what happens next, and the hold on anything that can carry data.
It follows on from Returns (RMAs): setting up and raising a return (opens in a new tab), which covers raising an RMA (Return Merchandise Authorisation, the reference the customer quotes) and authorising it. After receipt come credit notes, refunds and replacement orders (opens in a new tab), the customer pack, the RMA document and return labels (opens in a new tab), and the Returns report (opens in a new tab).
1. Where receiving lives, and when the button appears
Go to Outbound > Returns, open the return, and press Receive Items in the header. Its tooltip gives the rule: from RMA stage Authorised onwards, until every item is in, across as many sessions as you need.
So a return at Draft has no button and needs authorising first, one at Authorised or Awaiting Receipt has it, and once every line is in it goes for good.
2. The controls at the top of the screen
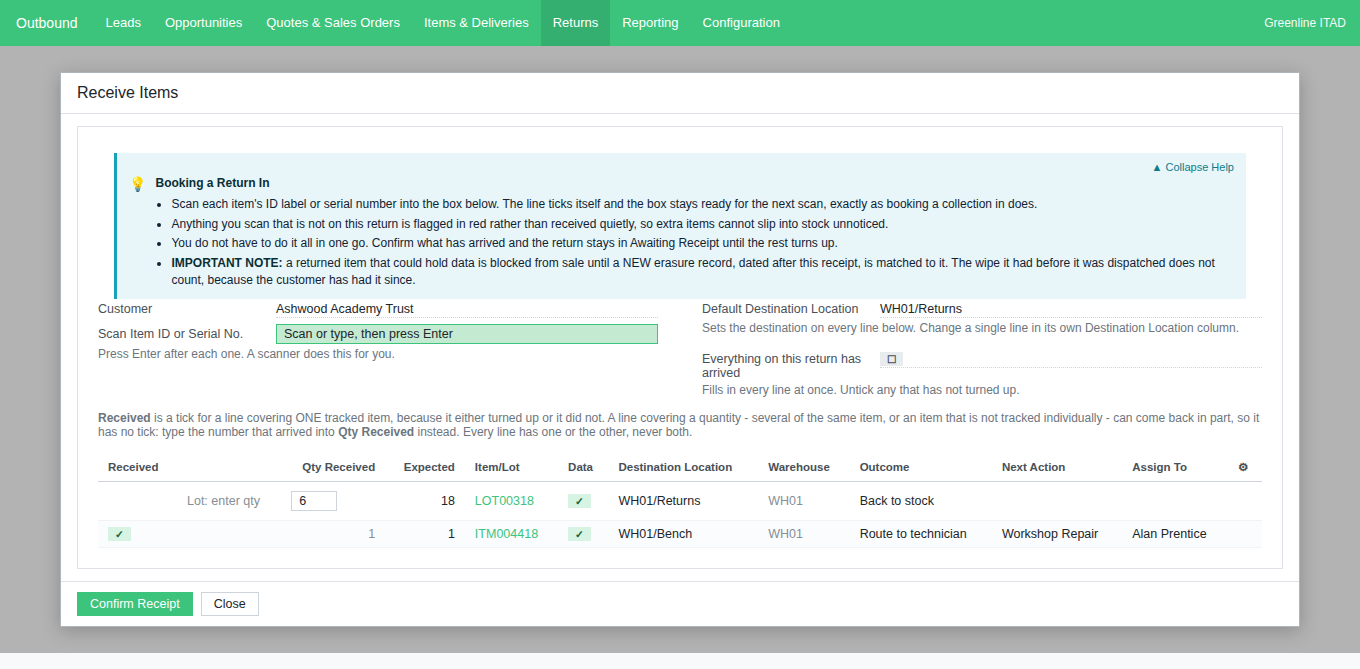
The popup opens with a blue help panel on booking a return in; Collapse Help puts it away and Expand Help brings it back. Under it sit three controls.
- Scan Item ID or Serial No. matches the item's own identifier and its serial number, since nobody knows which the customer wrote on the box. It only acts when you press Enter - a scanner does that for you, and typing then waiting does nothing.
- Default Destination Location sets the destination on every line below at once; each line can still be changed in its own Destination Location column. It resets each time the screen opens, so set it again next time.
- Everything on this return has arrived is a tick, not a button. Ticking fills every line in with its full expected quantity, unticking empties them again, and you can still correct a line by hand.
Confirm Receipt books everything in; Close discards the screen.
3. Why some rows have a tick and others a quantity box
The first column is chosen per row, not per screen. A line covering one individually tracked item gets a Received tick: it either turned up or it did not, and ticking it fills in Qty Received, which cannot be typed over. A line covering a quantity - several of one item on a lot, or a product not tracked individually - can come back in part, so it gets no tick and an editable Qty Received box.
Every line has one or the other, never both. Where the tick is missing, the cell beside it says why: Lot: enter qty or Untracked: enter qty.
4. Receiving in more than one go
Receiving in stages is normal. Confirm what has turned up and leave the rest: the return moves itself from Authorised to Awaiting Receipt. Reopen Receive Items later and only what is still due is listed, Expected showing the remainder: a line of 18 with 6 in reopens at 12. When the last line completes, the return moves to Received and stamps Received On, once only.
The progress banner counts lines, not units. A quantity line counts only once its full expected quantity is in: on a lot of 18 laptops plus a tracked desktop, with the desktop back and 6 laptops on the shelf, it still reads "1 of 2 items received".
The Received column in the return's Items list behaves the same way, off until the whole line is in. The optional-columns icon at the end of that header row adds a second column also headed Received, holding the number booked in so far.
5. Outcome - what happens to each item next
Outcome is set per line, in its own column, and defaults to Back to stock. Two items on one return can take different outcomes, and land in different warehouses, in one Confirm Receipt. The four are fixed: each runs different behaviour.
- Back to stock - the goods go into the destination location and nothing else is set. Ready to sell again, unless the data hold in section 6 applies.
- Route to technician - reveals Next Action (pre-filled with the first Repair / Upgrade action in your list, required), Assign To (required) and Due (optional). On confirm they land on the item as Next Action, Next Action Assigned To and Next Action Due Date. The goods still go into stock.
- New asset with new barcode - reveals Final Action, required, offering only actions flagged Is a Final Action?. The item record is duplicated, the goods are booked against the new item, the original is ended as below, and the ID label printer opens. Where the asset type can hold data the section 6 hold lands on the replacement, so the new barcode is held out of sale from the start. A second session on the line reuses the same replacement: one new barcode per line, not per session.
- End lifecycle - reveals Final Action too, required. The item is still received into stock, which catches people out. Its Intended Final Action is set, its Processing Status becomes Completed, and it is barred permanently from outbound orders and eCommerce publishing. An amber banner on its record says it stays in stock until physically disposed of.
Next Action and Final Action offer your own list, kept by an administrator at Inbound > Configuration > Hardware Auditing & Processing > Item Processing Actions.
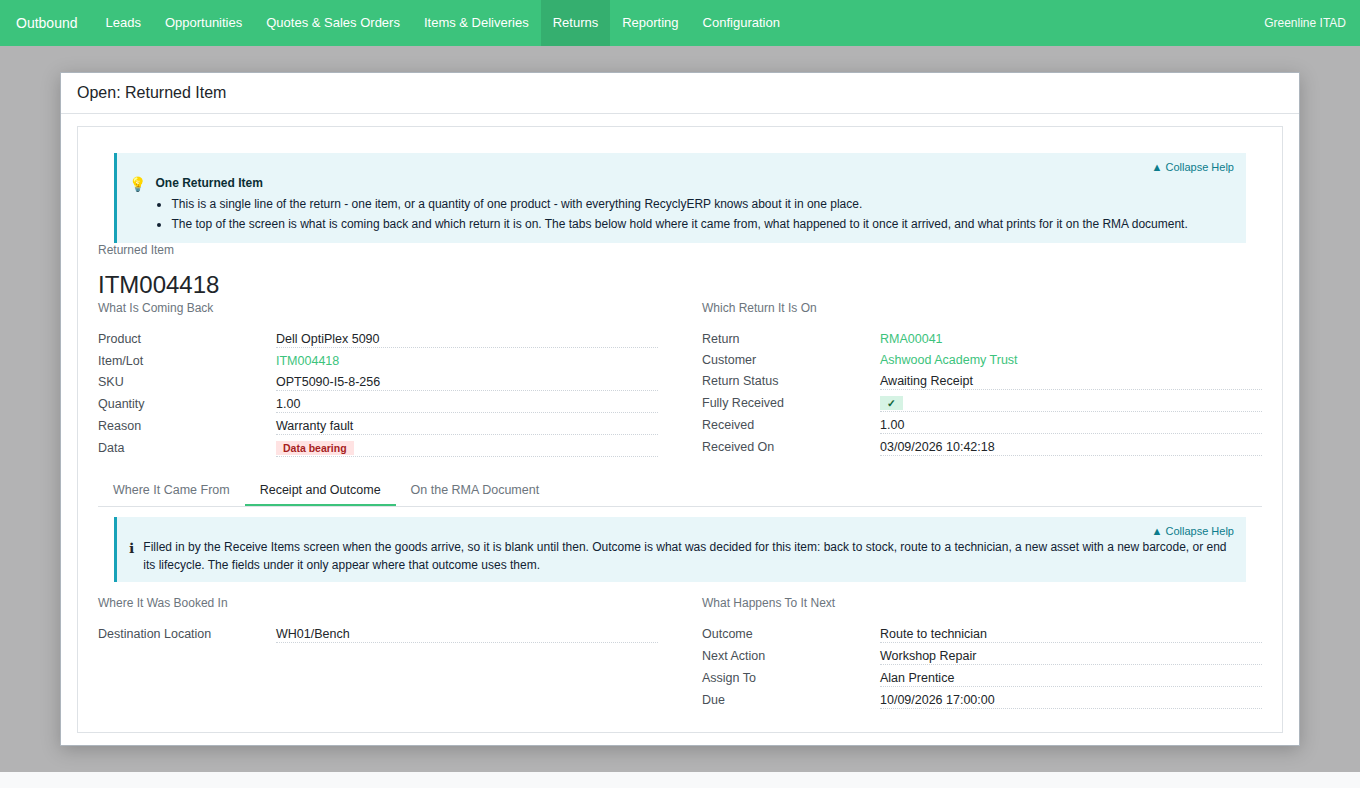
Clicking a row in the return's Items list opens it as Open: Returned Item. Its Receipt and Outcome tab holds what was decided - Destination Location, Outcome, and whichever of Next Action, Assign To, Due, Final Action and New Item that outcome used - written by Receive Items, so blank until the goods arrive. Two catches: on a line received over several sessions the Destination Location is the last session's, and a Back to stock line can still show a Next Action, pre-filled with your default repair action and saved whatever the outcome: outside Route to technician it is a leftover, not a job, with nobody assigned and nothing due.
6. The data-bearing hold, and why there is no override
IMPORTANT NOTE: a tracked item or lot whose asset type is marked May hold sensitive data is held out of sale the moment it is received, whatever its erasure history says: the customer has had it since it was wiped, so the certificate raised before dispatch proves nothing now.
- The line carries a red Data bearing badge in the Items list and on the returned-item screen, and the item's record a red banner: "Blocked from outbound sale until a new erasure record is matched. This item came back on a return, so the wipe it had before it was dispatched no longer counts." Held From Sale Since carries the date.
- The hold covers both routes out: the item cannot be put on an outbound order, and the eCommerce publishing screen sets it aside as unavailable instead of publishing it.
- It clears on its own when an erasure record dated after the receipt comes in through the normal audit report route and the item's data status reaches Data Destroyed/Erased.
- The hold going on and coming off are both written to the item's log, so you can show when it started and what lifted it.
- There is no manual override - no tick, no button, no administrator setting. Re-wipe the item and let the report clear it.
The Data column on the receiving screen ticks every line whose asset type can hold data, so read it before confirming. The hold needs an item record, so an untracked line is ticked but not held.
7. Anything scanned that is not on the return
An unexpected scan is flagged rather than received quietly, so extra items cannot slip into stock: a red list appears headed Not On This Return, with Scanned, Item/Lot, Status and a Reason box.
- Where the item was dispatched to this customer on a processed delivery, Status reads Not on this RMA and an administrator can add it with Add to RMA. A Reason is required first, and a log note records who added it and why.
- Where it was never dispatched to this customer, Status reads Not dispatched to this customer - handle outside Returns and all you can do is clear the row with the bin icon. Nothing here is stored on the return, so clearing is instant.
- Two scans never reach the list, and say so in a message instead: an unknown reference gets Not Recognised and is not added, and one already ticked above or received earlier gets Already On This Return rather than a duplicate line. That check reads the item's own reference, not its serial number, so a serial scanned twice can still land in the red list.
8. Where the stock goes, and what cannot be undone
Confirming raises one validated return receipt transfer per destination warehouse, per confirm: a return received over three sessions has three, all on the Return Receipts button. Each movement is chained to the delivery it went out on, which stops more coming back than went out. The read-only Warehouse column says which receipt a line lands on. Read the destination off the receipt's lines, not its header: the header carries the warehouse's standard receiving destination, your chosen location goes on the lines.
- Once anything has been received the return cannot be cancelled: "Return ... has already had items received into stock, so it cannot be cancelled. Resolve it instead." An administrator resolves it with Set to Resolved, offered at Awaiting Receipt and Received, which records who used it.
- A line with any quantity booked in cannot be removed, part-received included, because the goods are in stock. Removing a line with nothing received frees its quantity to be returned later and writes a log note.
- Quantity and Reason lock only once the line is fully received, so a part-received line can still have both corrected.
- Clicking Received on the status bar is refused, and points you at the button that books goods in.
- Default Destination Location offers every internal location, and each line opens on its own warehouse's return location: the Is a Return Location? flag at Inbound > Configuration > Logistics & Inventory > Locations decides where a line starts, not what you may pick; with none flagged there, its main stock location is used.
Common problems
- "It will not let me receive the quantity that arrived." More has been counted than the return expects. Recount, and raise a separate return for anything genuinely extra.
- "Changing Outcome does nothing." Scroll the item list sideways: Assign To, Due and Final Action sit right of Outcome. The popup already opens as wide as it goes, so on a narrow screen they start out of sight.
- "It went straight to Resolved and there is no Create Credit Note button." Correct where none of the goods on a Refund or Credit return had been invoiced. The banner headed Why this return is already Resolved explains it, on any return that closed itself.