Driver Hub is the app your drivers use on their phones to see their collections and record proof of collection. This guide is for the office: how to give a driver the app, how to look after their sign-ins, and how to read what comes back from a collection.
Drivers have two guides of their own, linked at the end: one to installing the app and signing in, and one to doing a collection, including with no signal. You can send them both before their first day.
1. What Driver Hub is and who it is for
Driver Hub is served from your own RecyclyERP, at your usual address followed by /driverhub/ (for example yourcompany.recyc.ly/driverhub/), so there is no app store involved: drivers open that address on their phone and add it to the home screen. It is made for phones and also works on a tablet. A driver's login is not a RecyclyERP user account: it cannot open RecyclyERP itself and does not count towards your RecyclyERP users, and what Driver Hub costs is in the next section. Office staff can open the app too, from Inbound > Collections & Drop-offs > Driver Hub, which opens it in a new browser tab as a phone-width column in the middle of the window, but only employees invited to Driver Hub can sign in.
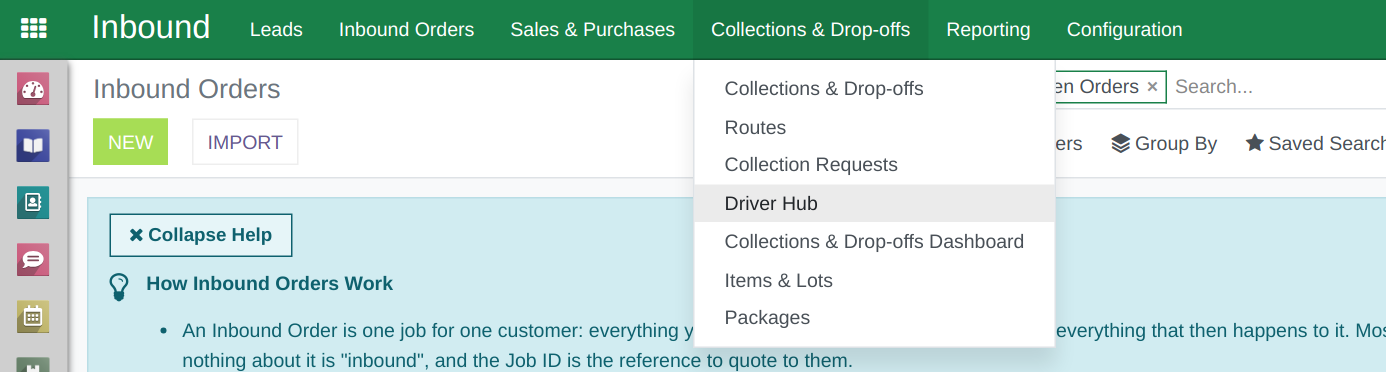
Inbound > Collections & Drop-offs, with the Driver Hub menu item.
2. What Driver Hub costs
Driver Hub is free until 31 December 2026, while feedback from live customers is used to make it resilient and to add the must-have features. From 1 January 2027, a driver who also holds a fully priced RecyclyERP user account stays free, and a driver with Driver Hub access only is billed £7.50 + VAT per driver per month, which helps cover the extra infrastructure, support and ongoing improvement of the app and the back end.
3. Before you start
The driver needs an employee record in Employees with Can be Driver for Collections ticked, which is what shows the Driver Hub tab on it. If you want to email them their sign-in link, give the employee an email address as well: their work email is used, or their private email when there is no work email. On a new system, the Setup Assistant item Set up Drivers & Crew, and invite drivers to Driver Hub, under Company Setup, takes you straight to the Employees list.
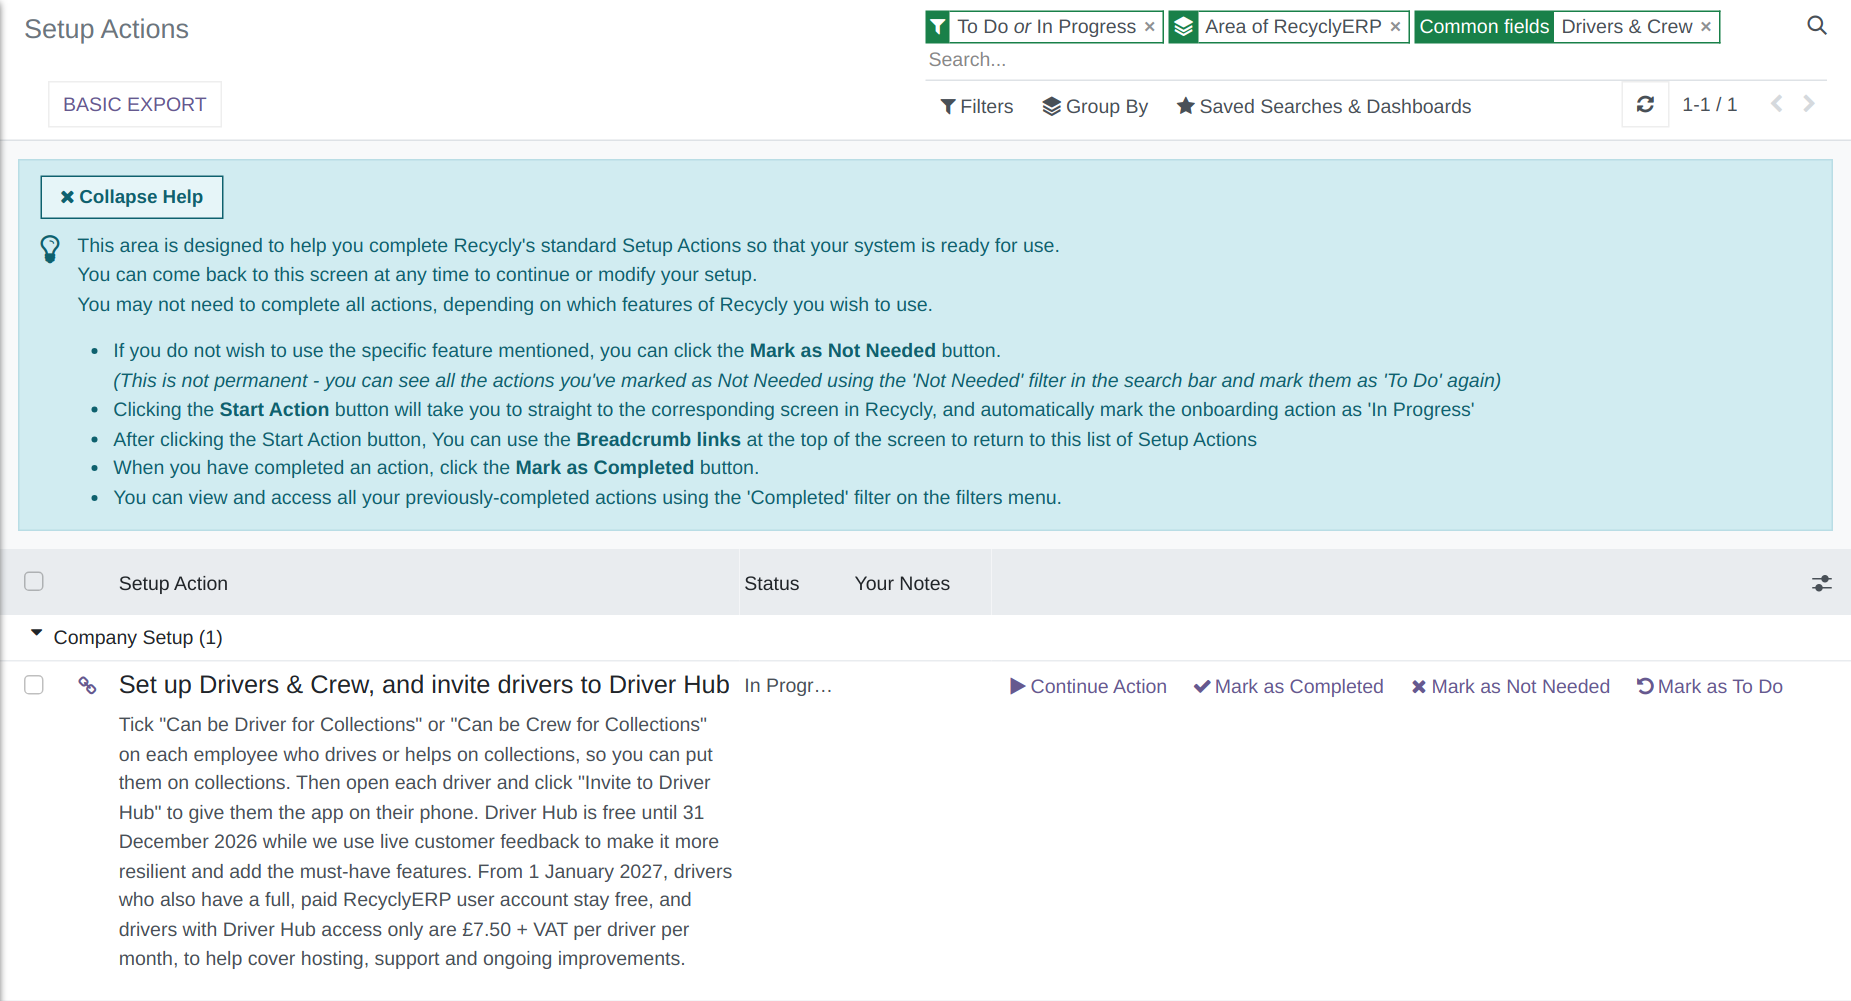
The Setup Assistant item, under Company Setup.
Read more: Setting up Drivers and Crew for Collections (opens in a new tab).
4. Inviting a driver
Open Employees, then the driver, then the Driver Hub tab, and click Invite to Driver Hub, whose tooltip reads "Creates a Driver Hub login for this person if they do not have one, and gives you a one-time code to sign in their phone." followed by what Driver Hub costs (section 2). The pop-up Sign In to Driver Hub shows a QR (Quick Response) code; under Or type on the phone it gives your Driver Hub address and the code, then "Install Driver Hub on the phone first, then scan this code from inside the app." and "This code works once and runs out at" with the date and time. Email Link to Driver sends the same code by email. Only users whose Inventory access is Administrator can invite drivers or send codes, and every code issued writes a Log Note on the employee saying who issued it and when it runs out.
While the button reads Invite to Driver Hub, a line of small grey text under it says whether this driver will cost money from 1 January 2027: "Driver Hub stays free for this driver, because they also have a full, paid RecyclyERP user account." when their own RecyclyERP user account is a full, paid one, and otherwise "Free until 31 December 2026. From 1 January 2027 this driver will cost £7.50 + VAT per month for Driver Hub, because they do not have a full, paid RecyclyERP user account."
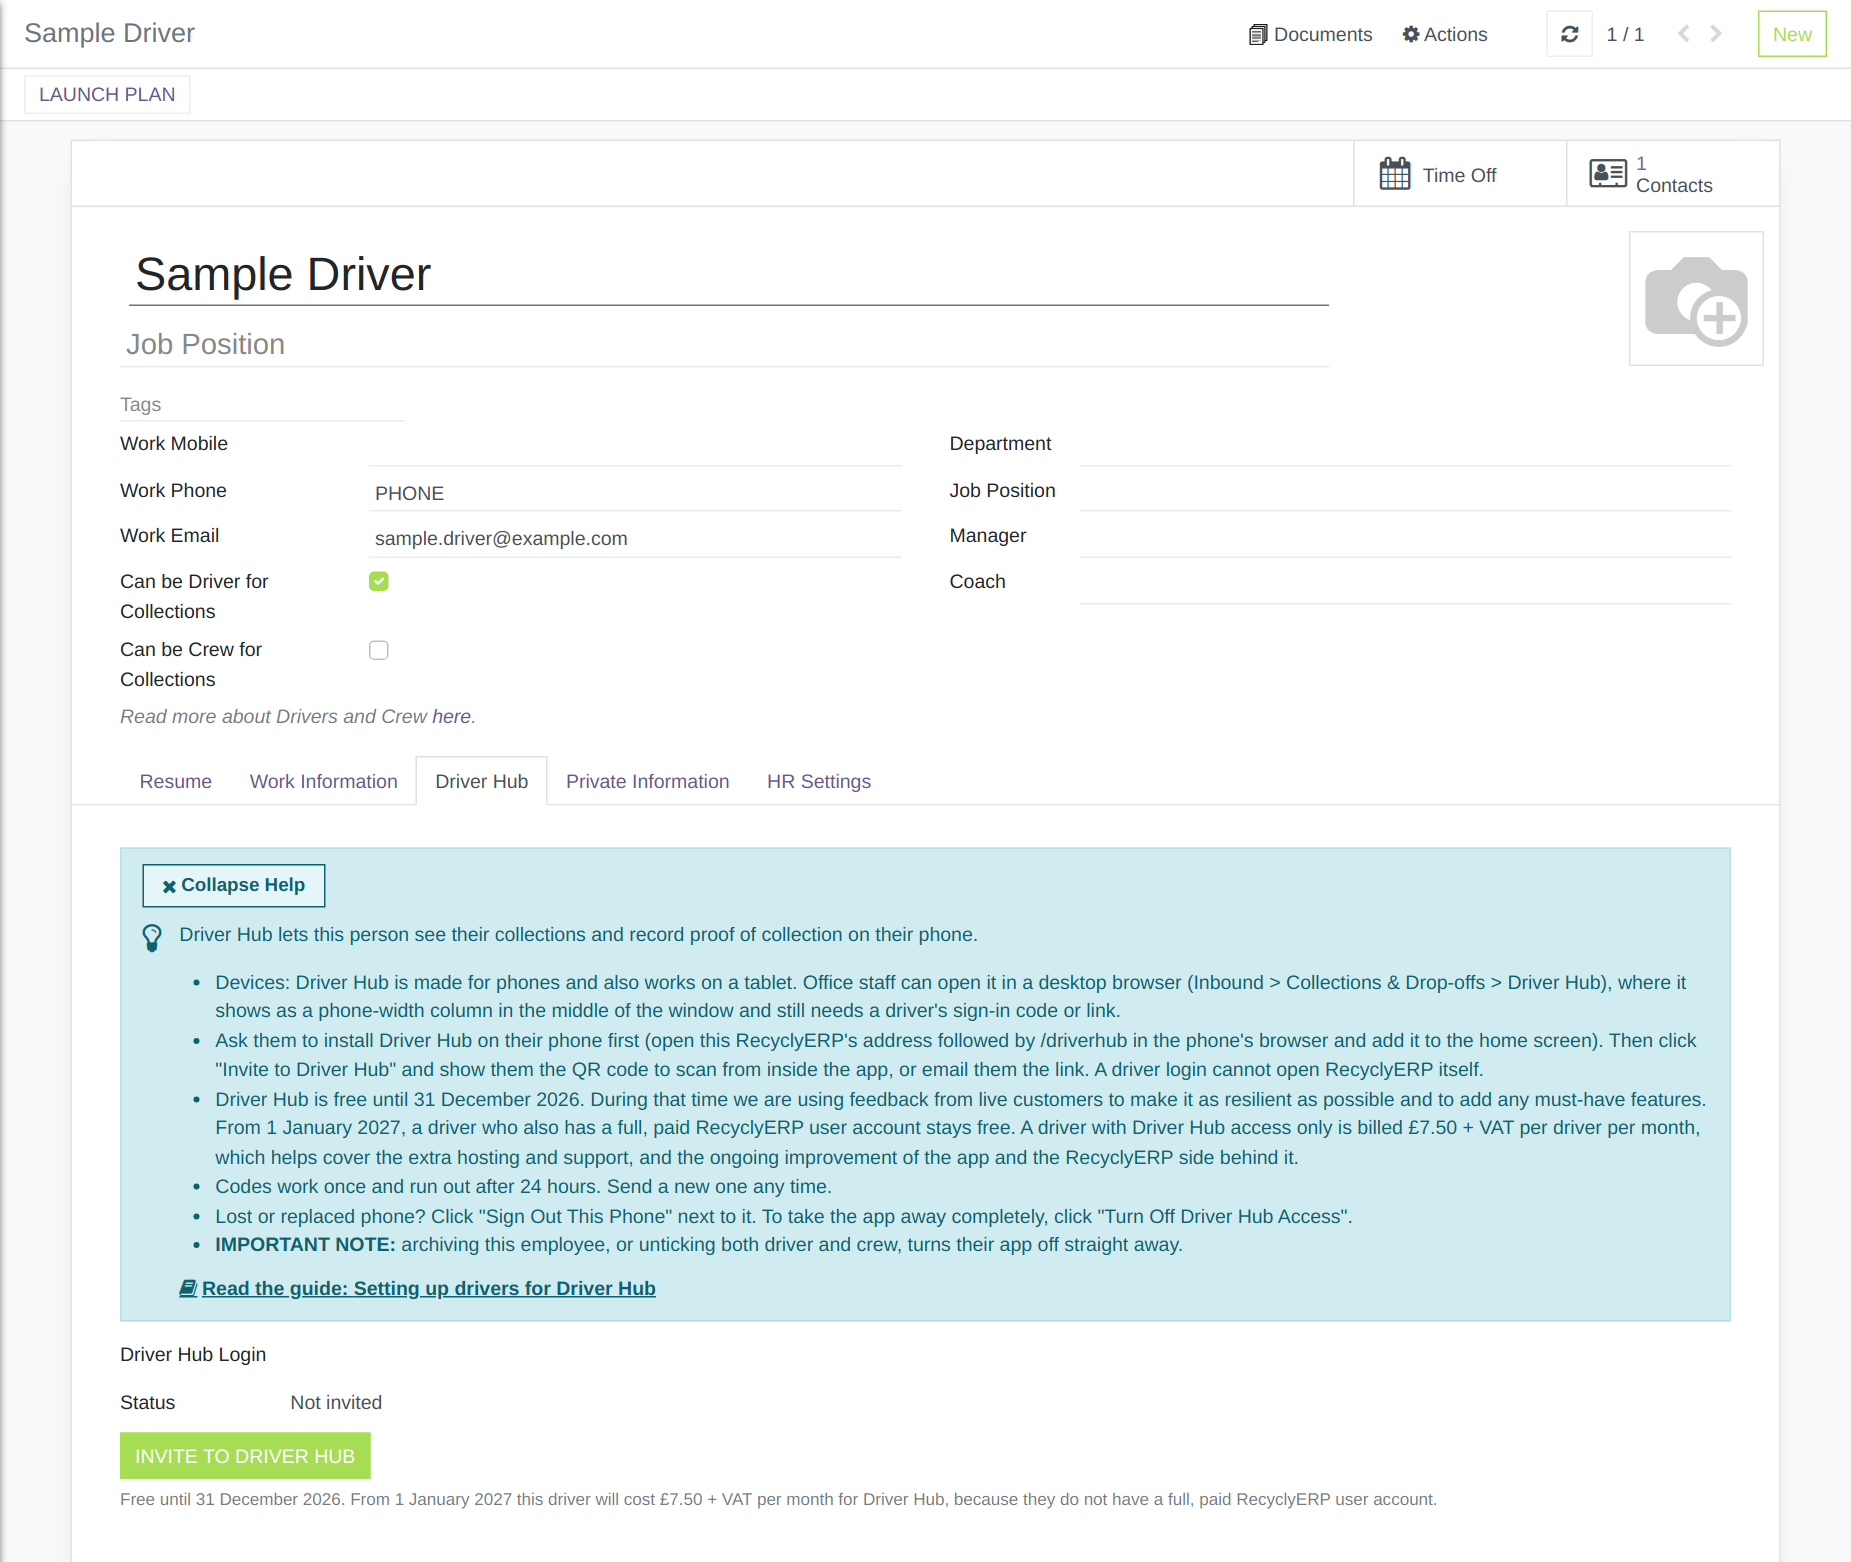
A driver's Driver Hub tab before they are invited, with its help panel open and the grey line under Invite to Driver Hub.
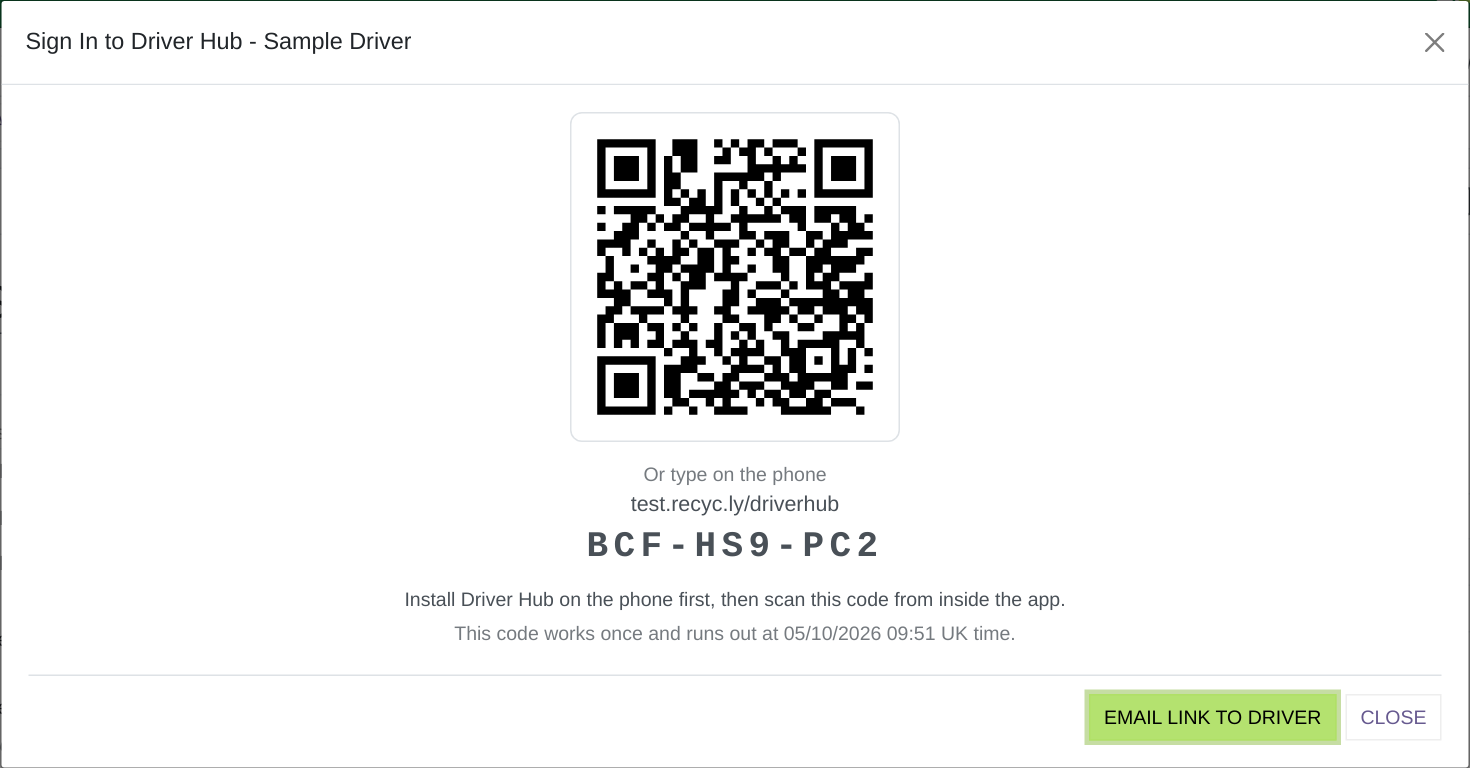
The Sign In to Driver Hub pop-up, with the QR code and the code typed out.
5. The Status line
The Status line on the tab tells you where the driver stands, with times in your company's business time (for example UK time):
- "Not invited": nobody has invited them yet.
- "Invited - code not used yet, runs out 23/10/2026 07:20 UK time", with the real date and time: a code is waiting to be used.
- "Invited - code ran out 23/10/2026 07:20 UK time, send a new one", or "Invited - no phone signed in, send a new code": they are invited but no phone is using the app, so send a new code.
- "Signed in on 2 phones", with the real number: the app is in use.
- "Turned off - invite again to give access": access was taken away, and only a new invitation gives it back.
6. Sending a new code
Once a driver has been invited, the button reads Send New Sign-in Code, for a new phone, a lost code or one that ran out. A code works once and runs out 24 hours after you issue it, and a new code cancels any unused one, so only the latest code ever works. Only a fingerprint of each code is kept (a one-way scramble that cannot be turned back into the code), never the code itself, so nobody can look a code up later: if a driver loses theirs, send a new one.
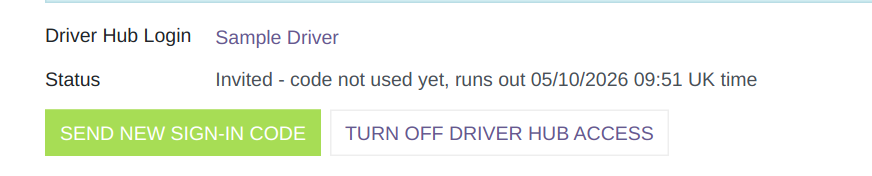
Invited, with the code not used yet, and Send New Sign-in Code.
7. The emailed link
Email Link to Driver sends the email template Driver Hub: sign-in link to the driver's work email, or to their private email when there is no work email; with neither, the button is greyed out and says "This person has no email address on their employee record." The email tells the driver to install Driver Hub first, then gives a Sign in to Driver Hub link, and shows the code and the time it runs out. On an Android phone or a computer the link opens the Driver Hub sign-in screen with the code already filled in, and waits on purpose for the driver to tap Sign In, because some email systems open links to check them before the person does, and signing in at once would let that check use the code up. On an iPhone the link opens Safari, which keeps its own sign-in separate from the installed app, so the email tells iPhone drivers to open Driver Hub from the home screen instead and type the code. You can change the email's wording under Users & Settings > Settings > Email Configuration > Email Templates.
8. Signed-in Phones
Once a driver has signed in, Signed-in Phones on the tab lists each phone, with Phone (for example "iPhone - Safari"), First Signed In and Last Contact. Sign Out This Phone is for a lost or replaced phone: "Use this for a lost or replaced phone. The phone is signed out the next time it connects, and anything on it that has not been sent is deleted." At its next contact the phone shows "This phone has been signed out by your office.", and each sign-out writes a Log Note on the employee naming the phone and who signed it out. Any Inventory user can sign phones out and turn access off, because both only ever take access away.
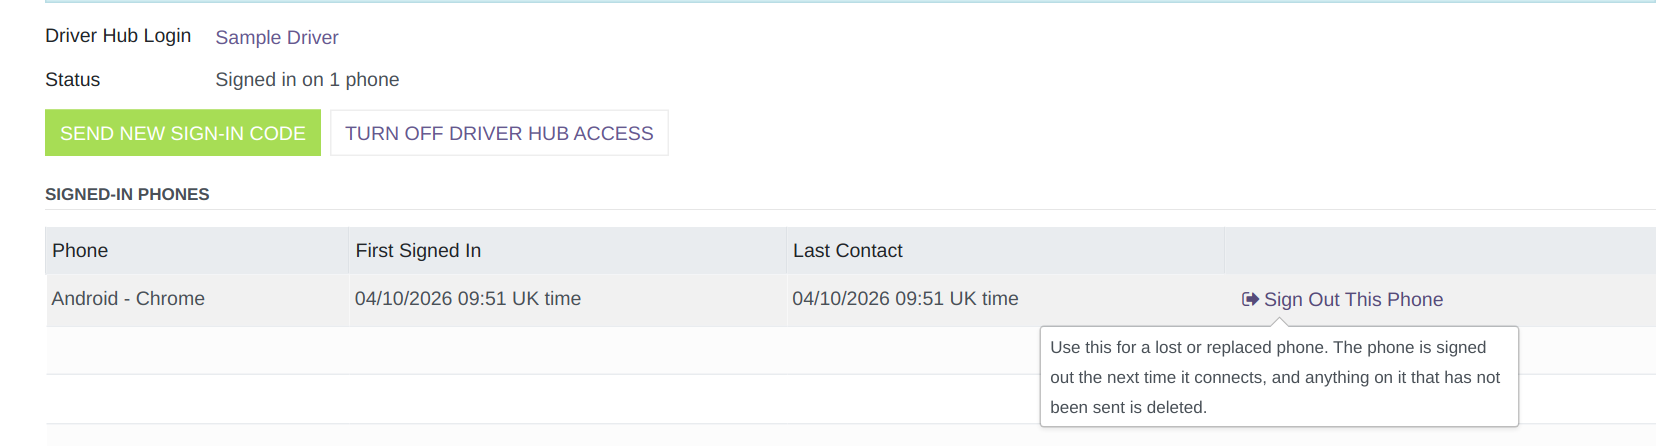
Signed-in Phones, with the Sign Out This Phone tooltip.
9. Leavers and people who no longer drive
Turn Off Driver Hub Access takes the app away completely, and asks first: "Turn off Driver Hub access for Sample Driver? Every phone will be signed out. Anything not yet sent from them will be lost." It then signs out every phone, cancels any unused code and writes a Log Note on the employee. Archiving the employee, or unticking both Can be Driver for Collections and Can be Crew for Collections, does the same straight away, with a Log Note saying why, for example "Driver Hub access turned off: employee archived." Nothing turns access back on by itself, so to give it back, click Invite to Driver Hub again. Their past proof of collection stays on the collections it belongs to.
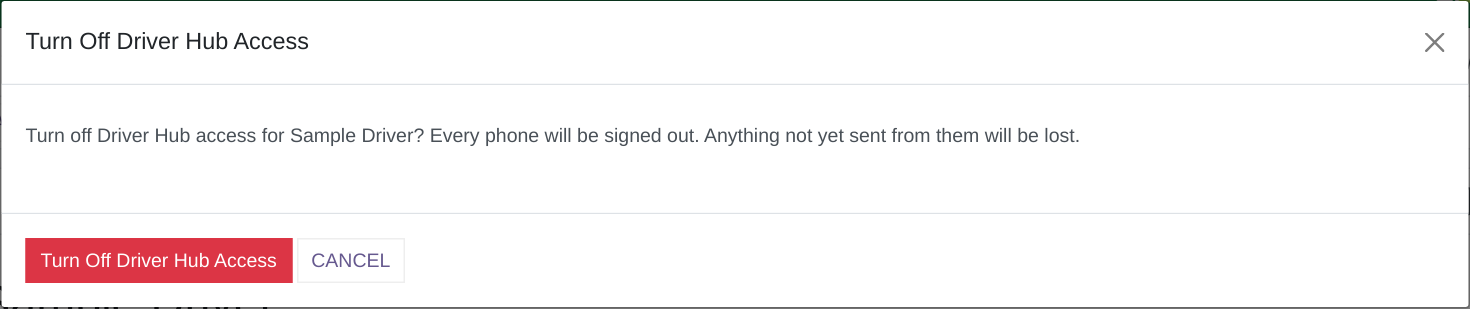
Turn Off Driver Hub Access asks before it does anything.
10. Who sees which collections
A driver sees a collection only when they are its Driver, or are in its Additional Crew, on one of its Vehicles & Personnel rows, and only in your own company. They see what the job needs (the customer, site address, contact name and phone, the time window and scheduled time, expected items and packages, notes, the hazardous badge and consignment code, and the vehicle) and never prices, values or other customers. A driver can change exactly four things: confirm their vehicle for the day, record proof of collection, record Could Not Collect, and sign out their own phone. Everything else is read-only for them, and every change they make to a collection writes a Log Note on it, naming the driver and saying "via Driver Hub".
11. What comes back from the app
When a driver finishes a collection in Driver Hub, a badge appears beside the collection's title: "Collected - on the vehicle", "Partly collected - on the vehicle" or "Could not collect", with "Needs Rebooking" beside it when the rest still has to be fetched (section 12). None of this completes the collection: its status stays as it was and nothing is booked in, so you book the goods in at the depot as usual.
Everything the driver sent is on the collection's Proof of Collection tab, which appears once they have sent anything; nobody can change it, and it is kept for as long as the collection is:
- the Driver Status, the Driver and the Vehicle, for example "LK24 ABC (confirmed in Driver Hub)" when it is the one the driver confirmed for the day
- Collected At, the time on the driver's phone when they finished, and Proof Received At, when RecyclyERP received it, which is later when the driver had no signal, both in your company's time, for example "22/10/2026 10:12 UK time"
- any Seal Numbers, the Load Weight, for example "120 kg (weighed)" or "120 kg (estimated)", and the Photos
- the customer's and the driver's Signatures, each with the printed name and the time signed; when the customer could not sign, theirs reads "Not signed: Nobody available to sign" or "Not signed: Customer refused to sign", with the driver's note and photo
- Counted by the Driver, with Expected, Counted, Difference and Reason for each item and package, and any row that differs in amber
- Problem, saying why the driver could not collect, or what is still at the customer.
The driver's own Log Notes go on the collection too, for example "Collected by Sample Driver via Driver Hub at 10:12 UK time: 4 items and 3 packages counted (1 difference), 3 photos, customer signed (Jo Smith), driver signed." When a driver confirms their vehicle for the day, it is written to their own row on the Vehicles & Personnel tab of each of that day's collections they have not collected yet, with a Log Note.
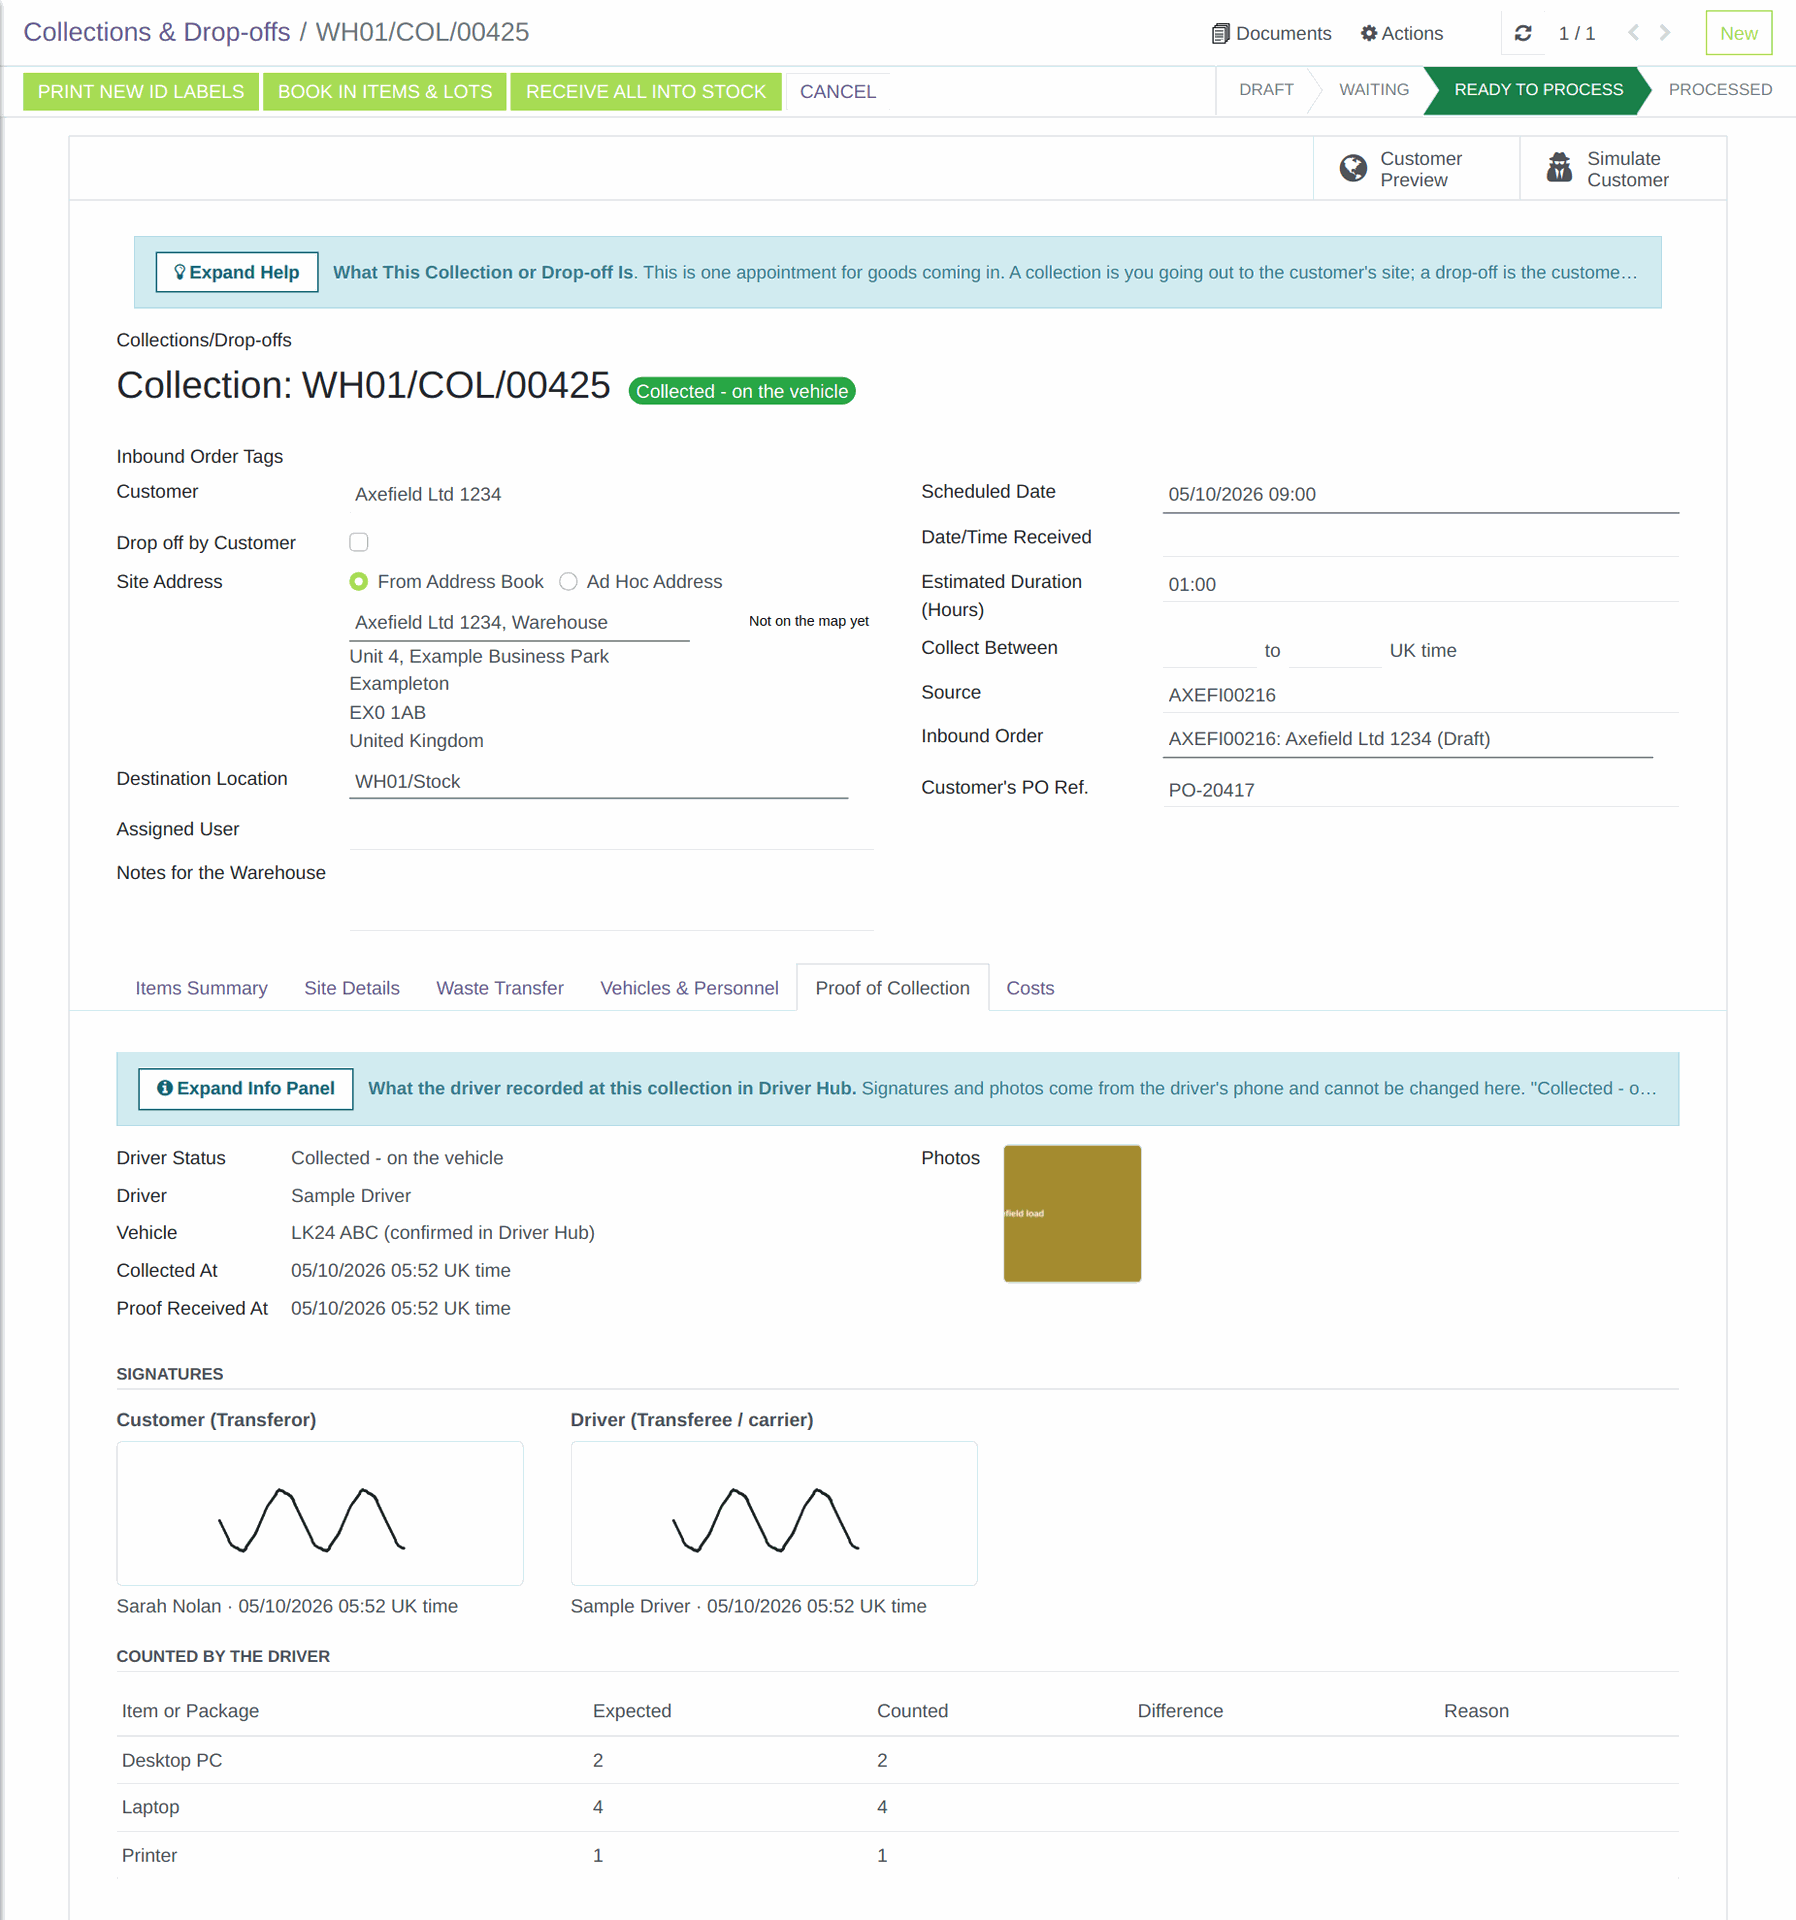
A collection the driver has finished, with its "Collected - on the vehicle" badge and the Proof of Collection tab open.
12. Rebooking
Needs Rebooking is ticked when the driver records Could Not Collect, or collects only part and answers yes to "Does the rest need another visit?", and the collection then carries an amber Needs Rebooking badge, which the Route Planning board shows too. To see every one, open Inbound > Collections & Drop-offs > Collections & Drop-offs and choose Needs Rebooking, the last item in the Filters menu.
It clears when you move the Scheduled Date to a later day, with a Log Note such as "Needs Rebooking cleared: the Scheduled Date moved to 23/10/2026, a later day.", or when you click Rebooking Not Needed on the Proof of Collection tab because the rest will not be collected, which writes "Rebooking not needed: Needs Rebooking cleared by" followed by your name. For a collection the driver could not collect, moving the date also clears the red "Could not collect" badge and takes the collection off any route it was on for another day, so Driver Hub offers it to the driver again on its new day, and the note goes on "Driver Status cleared, so the new visit can be done in Driver Hub."
If the office cancels a collection, or moves it to another day, while the driver has no signal, the office's change stands: the collection stays as the office left it, the driver's proof is still kept on it, and whoever made the change gets a To-Do, "Collected after it was cancelled - please check" or, for example, "Collected on 22/10/2026 after being moved to 24/10/2026 - please check".
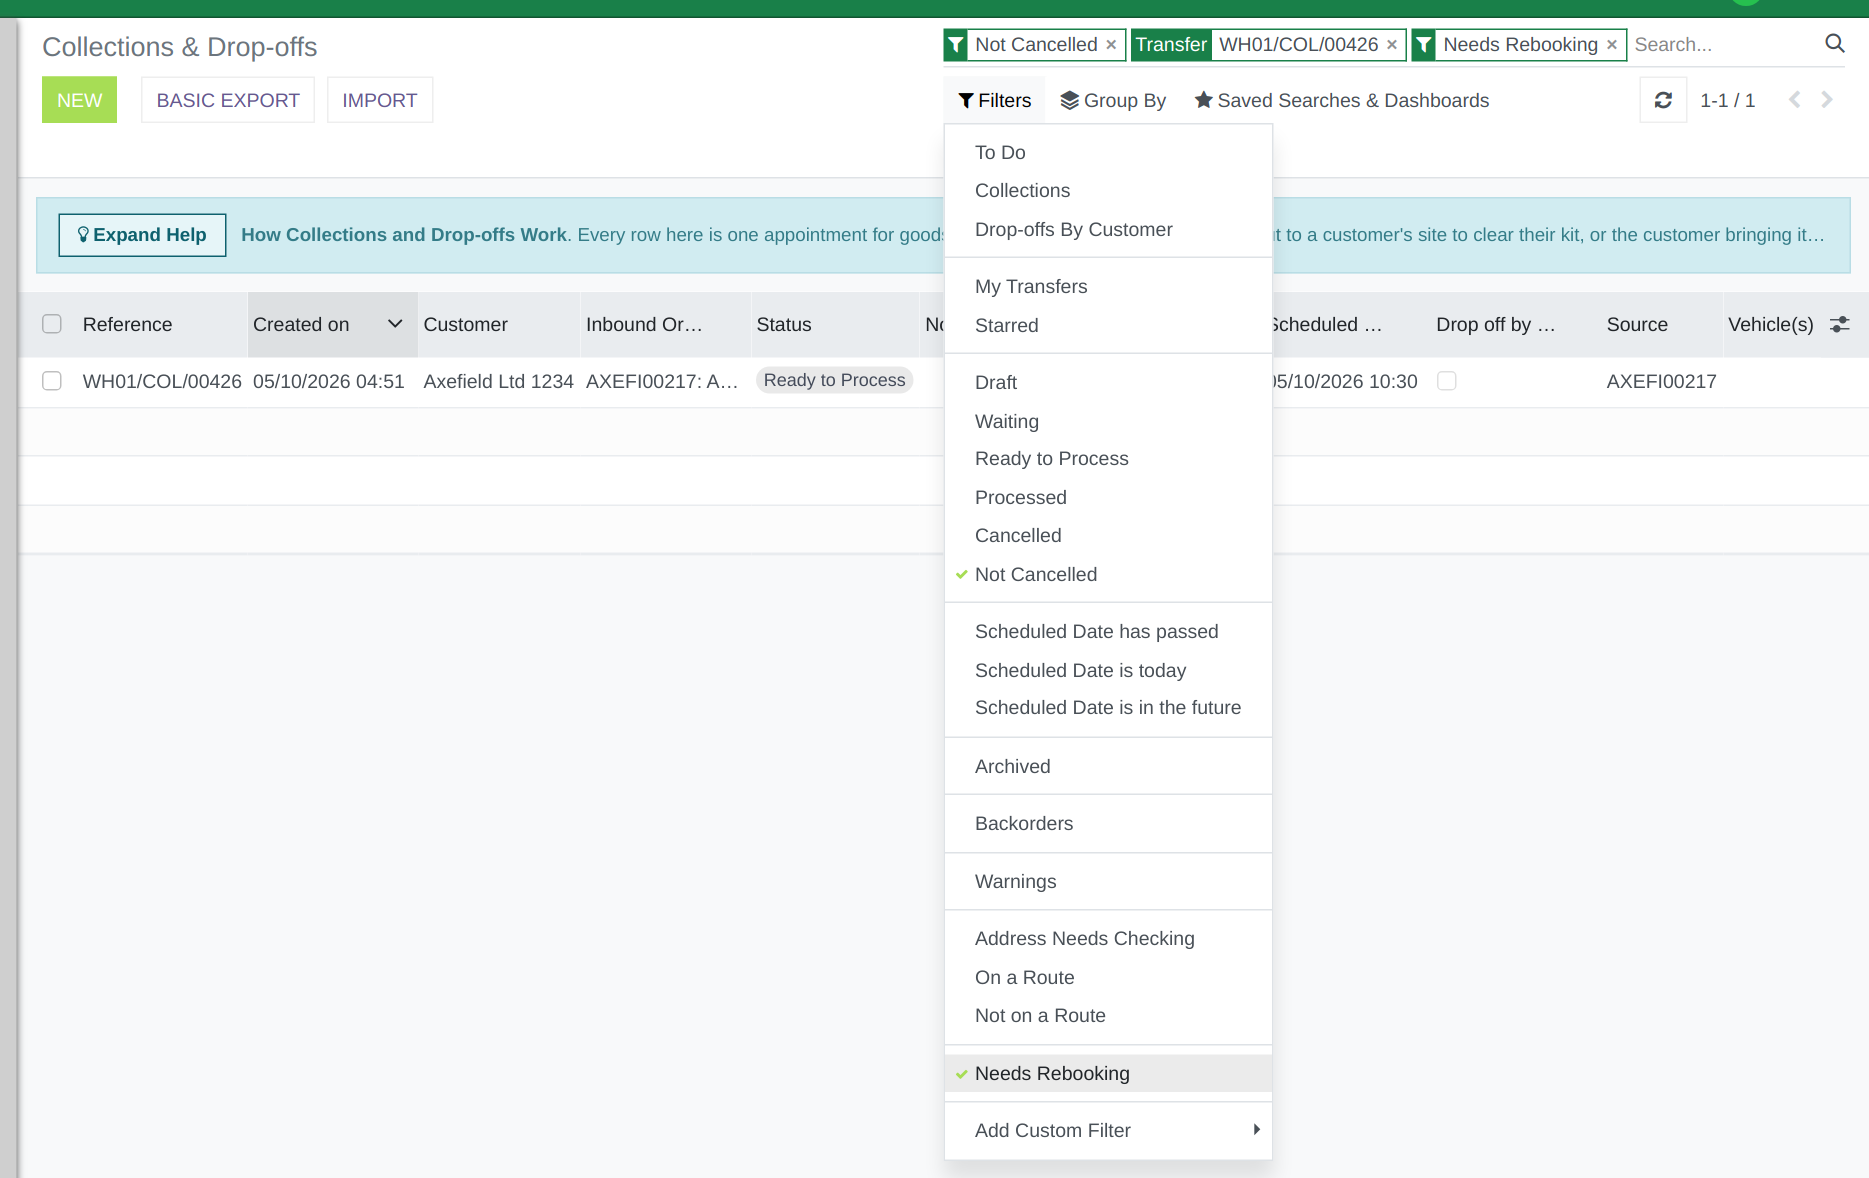
The collections list with Needs Rebooking ticked, the last item in the Filters menu.
13. The signed documents
When This transfer moves waste is ticked on the collection's Waste Transfer tab, the driver gets the Waste Transfer Note signed on site; otherwise it is the Duty of Care Document, and it is both when Also sign the Duty of Care Document is ticked in Settings (section 14). On the Waste Transfer Note the customer signs in the Transferor signature box and the driver in the Transferee / carrier signature box, each with "Print name:" and "Date:" filled in, and when the customer could not sign, their line reads, for example, "Not signed: Nobody available to sign (photo held on file)".
Until the load is booked in at the depot, "A. Description of the waste" is filled from what the driver counted, with the driver's one load weight shared out by how many of each were counted, so every row is marked "(estimated)", even when the driver weighed the load. Once the load is booked in, the note shows the booked-in items as before.
Once the documents are signed:
- the signed PDF is attached to the collection, for example as "Waste Transfer Note - WH01/COL/00042 - signed.pdf", with a Log Note saying it was made and whether it was emailed
- unless you untick Email the signed documents to the customer (section 14), it is emailed straight away to the collection's Site Contact, or to the customer when there is none, with the email template Signed Waste Transfer Note, which you can change under Users & Settings > Settings > Email Configuration > Email Templates
- the customer finds it on the Customer Portal, on the collection under Collections / Drop-offs, beneath the Documents heading, as "Waste Transfer Note - signed (PDF)"; photos and signatures are never shown there, only the signed PDFs.
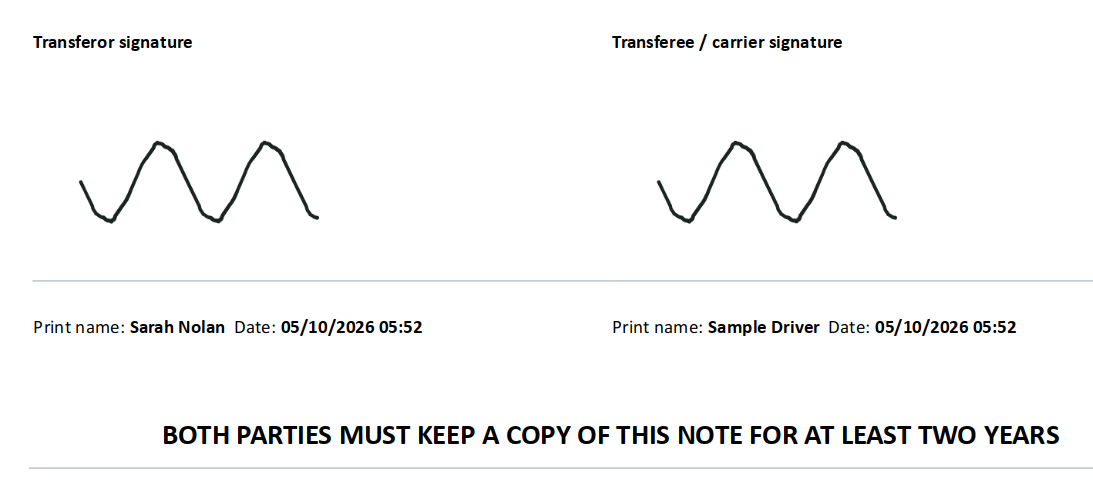
The two signature boxes on a signed Waste Transfer Note, filled in from Driver Hub.
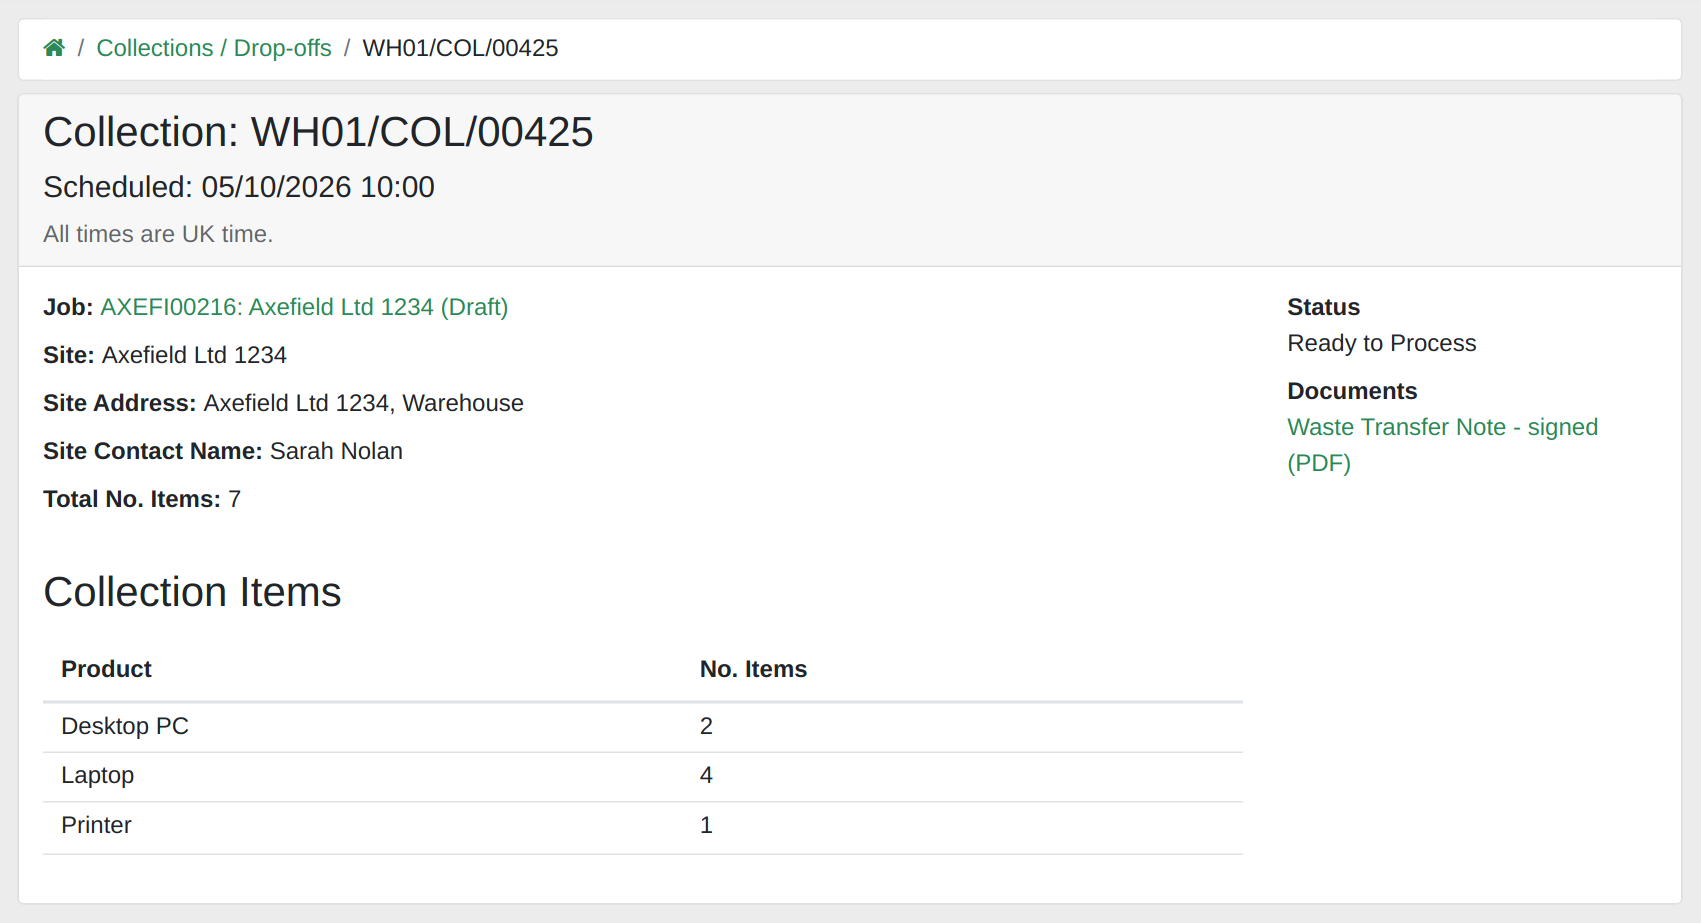
The collection on the Customer Portal, with the signed Waste Transfer Note under Documents.
14. Settings
Under Users & Settings > Settings > Inbound, the Driver Hub heading reads "Drivers get the Waste Transfer Note signed on site by the customer and themselves. Collections not marked "This transfer moves waste" use the Duty of Care Document instead." and has two settings. Also sign the Duty of Care Document is unticked to start with: "For customers who still use a Duty of Care Document. It is shown and signed beside the Waste Transfer Note, and sent and kept the same way." Email the signed documents to the customer is ticked to start with: "Sends the signed documents to the collection's contact as soon as the driver's proof arrives. They are always attached to the collection and shown on the Customer Portal." Both apply to every company in your RecyclyERP, and only users who can open Settings can change them.
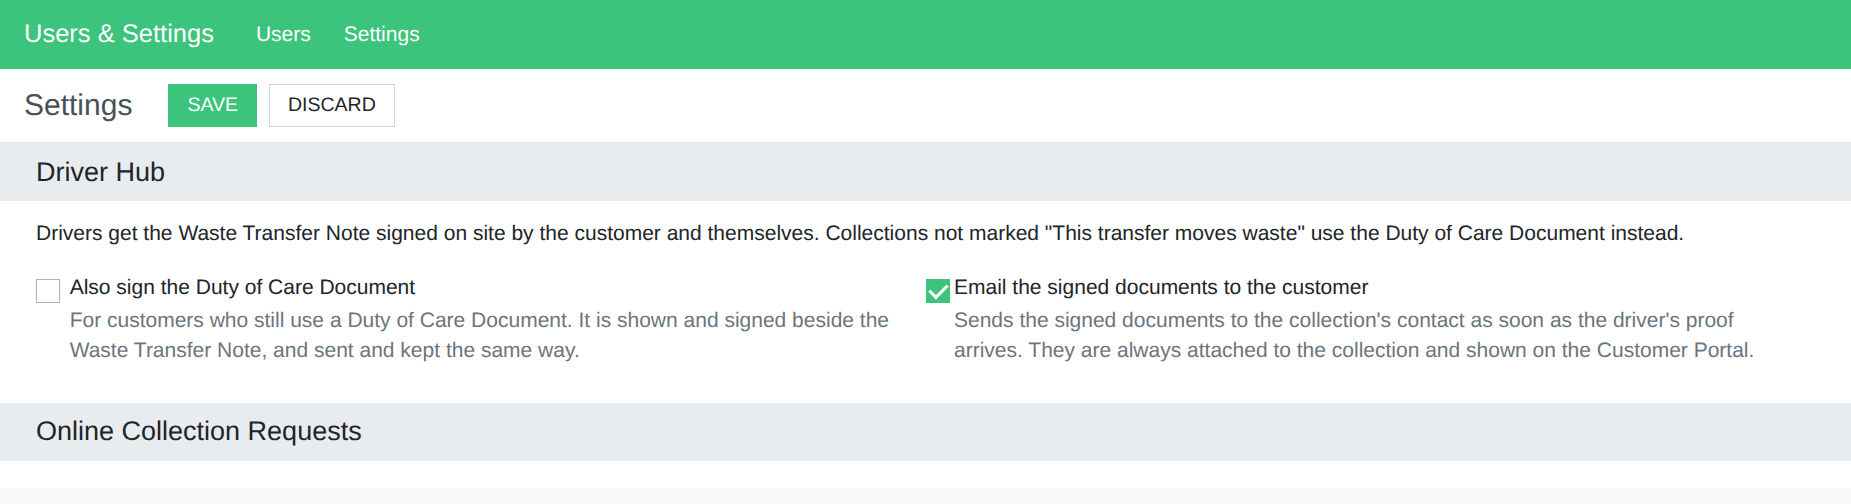
The Driver Hub settings under Users & Settings > Settings > Inbound (an illustration of the screen).
15. Your own Waste Transfer Note template
If your Waste Transfer Note or Duty of Care Document is still the one RecyclyERP shipped, the upgrade has already added the signature boxes to it. An upgrade never overwrites a template you have edited, so if you use your own version, add the Driver Hub signatures to it yourself under Templates & Documents > Document Templates. On a collection template's Merge Fields tab they are listed under Commonly Used Fields: "Driver Hub: Customer Signature (picture)", "Driver Hub: Customer Printed Name", "Driver Hub: Customer Signed At", "Driver Hub: Not-signed Reason", "Driver Hub: Driver Signature (picture)", "Driver Hub: Driver Printed Name" and "Driver Hub: Driver Signed At".
The shipped Waste Transfer Note uses MERGEIMAGE record.customer_signature 50 and MERGEIMAGE record.driver_signature 50 for the two signatures (in Word, press Ctrl+F9 and type the code rather than adding a MERGEFIELD; 50 is the width in millimetres), record.customer_printed_name, record.customer_signed_at, record.driver_printed_name and record.driver_signed_at for the names and times, record.customer_not_signed_reason for the not-signed wording, and record.wtn_transfer_datetime_label for "Date & time of transfer:". The estimated rows in section A need nothing extra: they use the same record.wtn_line_ids fields as booked-in rows, and "(estimated)" comes from record.wtn_line_ids.weight_accuracy.
16. Where the drivers' guides are, and help
The help panel at the top of the Driver Hub tab links this guide, under Read the guide. In the app, the ? at the top right of each screen opens the drivers' help for that screen, and "Installing and logging in to Driver Hub" and "Doing a collection, including no signal" are the guides to send your drivers before their first day.
Read more: Installing and logging in to Driver Hub (opens in a new tab), Doing a collection, including no signal (opens in a new tab), Setting up Drivers and Crew for Collections (opens in a new tab).