An ad-hoc address is a one-off collection or delivery address that belongs to a customer and is deliberately kept out of the Address Book: a branch office closing for good, a leaver's home address, or a delivery to somewhere you will never go again.
This guide explains how to create one so that it can be used on a job, what it is used for, how to tidy them up, and how to load several at once.
1. What an ad-hoc address holds
You can tell an ad-hoc address from an ordinary contact by the green Ad-Hoc Address ribbon on it.
It deliberately holds less than an Address Book contact: a name or an organisation, an address, and contact details for whoever is meeting the driver. There are no sites beneath it, no site access details, no contracts, no customer portal settings, no marketing detail and no tags.
If somebody needs gate codes, loading bay notes or parking instructions for a place, set it up as a proper Site under the customer in Address Book > Companies & Contacts instead. See The Address Book: Companies, Sites and Contacts (opens in a new tab).
2. Every ad-hoc address belongs to one customer
The Linked Address Book Customer box is what makes an ad-hoc address usable. It is offered on that customer's jobs and on nobody else's, which is also why one customer is never shown another customer's ad-hoc addresses.
The linked customer has to be the customer's own Address Book record - a company, or a stand-alone individual - not a contact person under a company. An ad-hoc address will not save without it.
3. Creating one from the job (recommended)
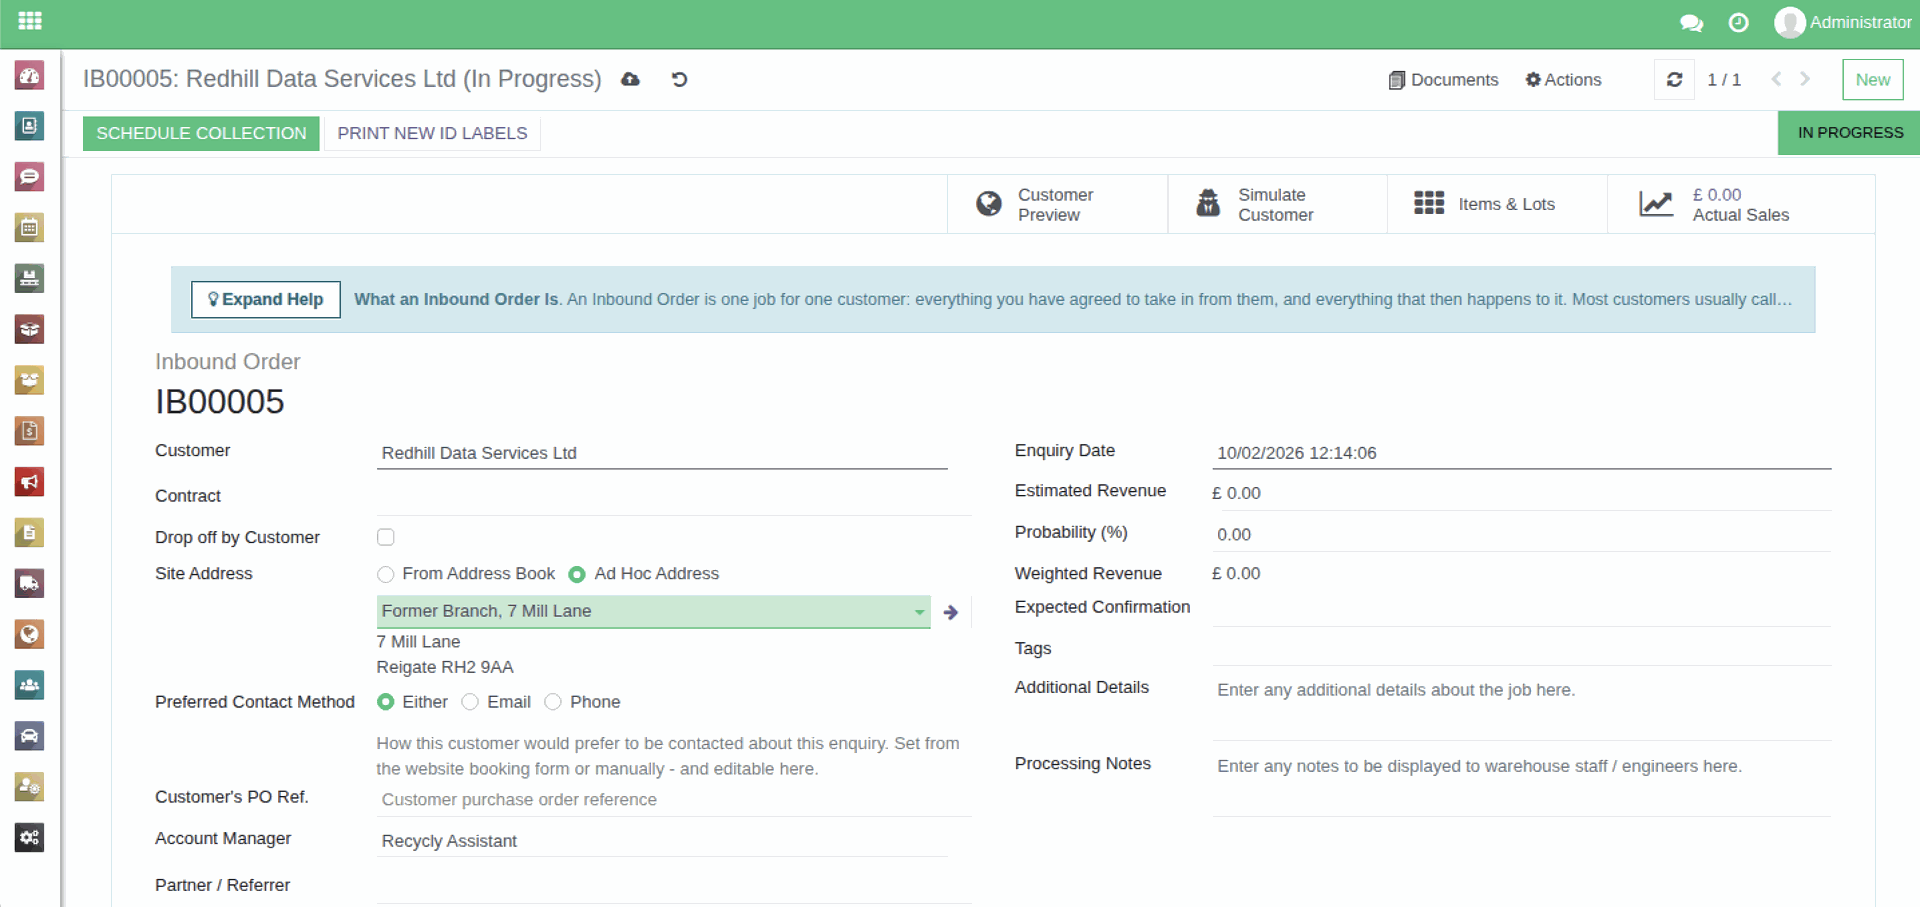
Create it from the job that needs it, and the link to the customer is made for you:
- A collection job: Inbound > Inbound Orders > Inbound Orders > open the job > next to Site Address, choose "Ad Hoc Address", then pick or create the address in the box underneath it, "Select or Create an Ad Hoc Contact & Address".
- An appointment: the same choice on an appointment at Inbound > Collections & Drop-offs.
- An outbound order: Outbound > Quotes & Sales Orders > open the order > next to Delivery Address, choose "Ad Hoc Address", then pick or create the address in the box underneath it.
Where your system only ever uses ad-hoc addresses there is no choice to make, and the ad-hoc box is already the one on screen.
4. Creating one from the Ad-Hoc Addresses list
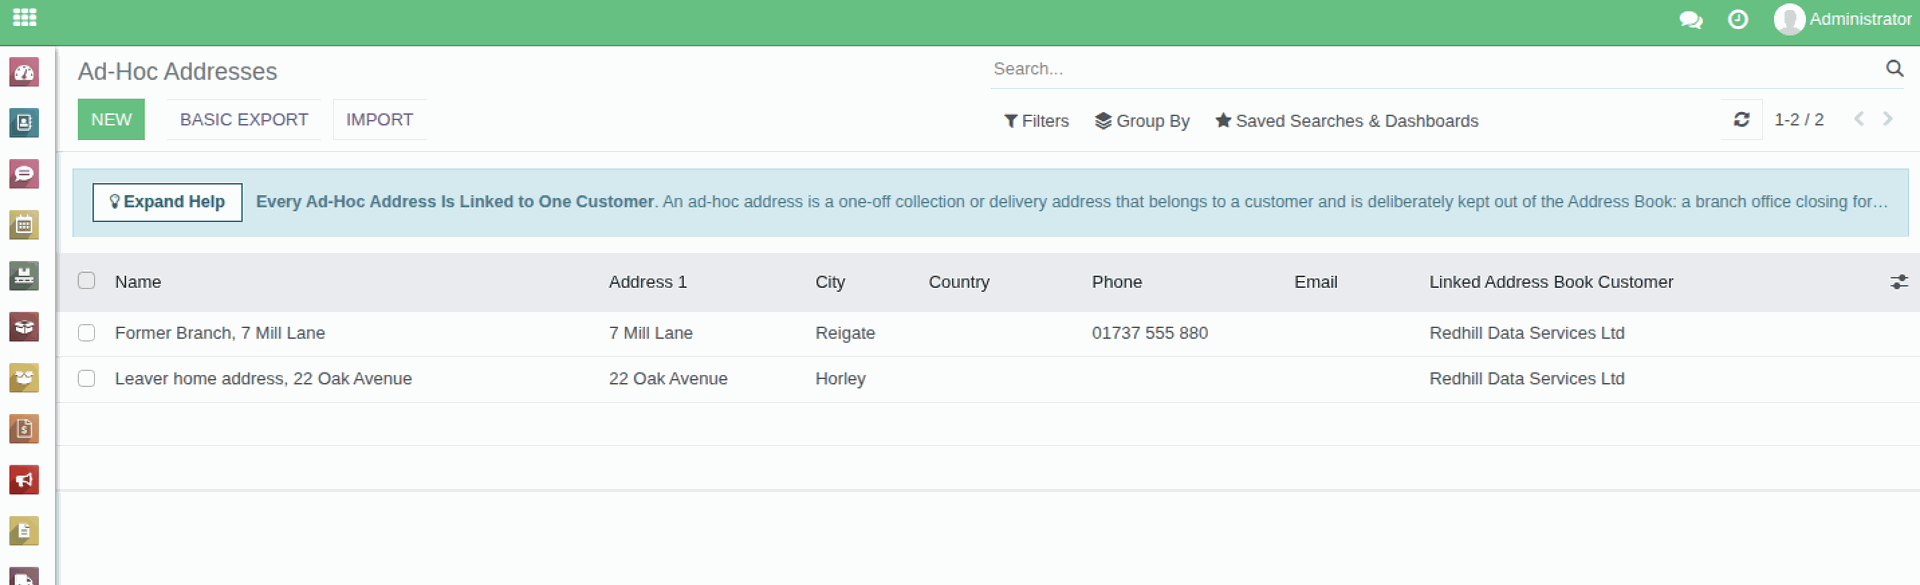
Address Book > Ad-Hoc Addresses is the only place all of them can be seen together. To create one there, click New, fill in the name or organisation and the address, and choose the customer in Linked Address Book Customer.
When naming it:
- Individual asks for a first name or a last name, with an Organisation Name box underneath for the business at that address.
- Company asks for the Organisation Name on its own.
- That choice is locked once the address is saved, so an address saved as the wrong one has to be created again.
- Fill in at least the first line of the address or the town. Saving with no name is refused with a message starting "Ad Hoc Addresses must have a name", and saving without either of those address lines is refused with "Ad Hoc Addresses must have address information (at least street or city)".
- Nothing checks the postcode, so an address will save without one and still send a driver to the wrong place. Put the whole address in.
5. Where ad-hoc addresses are used
- On the job the address was created from.
- On the collection or delivery booked off that job.
- On your customer's own view of that job on the Customer Portal, so a wrong or missing postcode is a wasted journey.
Your printed documents, such as the "Duty of Care Document", quote the customer's own Address Book address rather than the ad-hoc one, so correcting an ad-hoc address will not change what those documents say.
Ad-hoc addresses never appear in Address Book > Companies & Contacts or in any ordinary contact search, and the Ad-Hoc Addresses list never shows an ordinary Address Book contact. That is deliberate, not a fault.
6. Correcting and tidying
- The linked customer, the address lines, the town, the phone number and the email address can be changed straight on the list. Select several rows and edit one cell to change it on all of them at once, which is the quickest way to correct a run of addresses carrying the same mistake. To change the name, the county or the country, open the address itself.
- An edit reaches every job already pointing at that address, because they all use the one record. So correct a mistake here, but never reuse an old address for a different place - create a fresh one from the job instead.
- Nothing removes duplicates for you. Two people booking two collections from the same closing office will each create their own address for it, and tidying those up is part of what the list is for.
- Older addresses with no linked customer. An address created before the Linked Address Book Customer box could be set may show it empty, and it cannot be picked on any job until the customer is set. Sort by that column to bring the blanks together, then set the customer on each - or select several that belong to the same customer and set it once for all of them.
7. Loading several at once
On Address Book > Ad-Hoc Addresses, use the import option and take the template offered there: "Download an Excel template for importing Ad-Hoc Addresses". Put each customer's name in its Linked Address Book Customer column exactly as it appears in Address Book > Companies & Contacts. A row with that column empty is refused rather than loaded, so nothing lands on the list unusable.
Do not use the ordinary customers and suppliers template for this: it creates Address Book contacts instead.
8. Mistakes to avoid
- Switching a job back to "From Address Book". That throws away the ad-hoc address you had picked, and switching back again does not bring it back - it has to be picked again.
- Changing the Customer on a job. That clears the ad-hoc address for the same reason: it belonged to the customer you have just changed.